Author Topic: Removing Cobbled up Flywheels  (Read 17996 times)

dieselgman

  • Hero Member
  • *****
  • Posts: 3189
    • View Profile
    • Lister Parts
Re: Removing Cobbled up Flywheels
« Reply #15 on: August 03, 2011, 08:34:30 PM »
You guys are very clever!

dieselgman
ALL Things Lister/Petter - Americas
Lyons Kansas warehousing and rebuild operations

listard-jp2

  • Hero Member
  • *****
  • Posts: 662
    • View Profile
Re: Removing Cobbled up Flywheels
« Reply #16 on: August 04, 2011, 01:15:49 PM »
Here is my manly home made gib key puller.  Works great.


That's a very credible copy of the original Lister item (and possibly inspired by this post: http://listerengine.com/smf/index.php?topic=5549.0) :), I suspect that having used this a couple of times, you cannot believe how easy it is to remove a correctly fitted Lister CS flywheel key. Does your version incorporate a thrust bearing on the the end of the thread where it comes into contact with the end of the crank so as to reduce friction?

You should consider going into production as there is sure to be a large demand for a product such as this in the US from fellow forum members.
« Last Edit: August 04, 2011, 01:21:21 PM by listard-jp2 »

Apogee

  • Jr. Member
  • **
  • Posts: 78
    • View Profile
Re: Removing Cobbled up Flywheels
« Reply #17 on: August 04, 2011, 02:02:44 PM »
This is the first time that I've ever seen a tool like this.

Thank you for sharing your pics of it!

Now I know what I need to build...

Steve

Brinkjr

  • Newbie
  • *
  • Posts: 23
    • View Profile
Re: Removing Cobbled up Flywheels
« Reply #18 on: August 05, 2011, 03:03:59 AM »
Good news!    After 3 days of tightening and Kroil the first gib key is out.  Started pulling and penetrating oil the second.   Tried to move the flywheel but it didn't budge.   I'll make a puller out of a couple of plates and some threaded rod.  

PS. How do you attach pics using gmail?
« Last Edit: August 05, 2011, 03:29:15 PM by Brinkjr »
1932 5hp CS (recond parts)
1958 8hp CS (mostly assbld)

richardhula

  • Guest
Re: Removing Cobbled up Flywheels
« Reply #19 on: August 05, 2011, 09:24:46 AM »
To insert an image/pic (not attach) within your post first find the URL of the image you want to use. This could be a picture of your own posted to an image hosting site or an existing picture from someone else's website (with their permission). Ofter right clicking on an image on a web page will offer "Copy image address" for example.

Once you have the image URL just test to see it works by pasting into your browser.

If happy with that then with cursor on fresh line click on the "Inset image" icon (third from left) at top of the posting box of this forum.

The following will appear
Code: [Select]
[img][/img]
Between the two sets of square brackets insert your image URL.

Code: [Select]
[img]put your image URL here[/img]
Press "Preview" to see results & your done.

Brinkjr

  • Newbie
  • *
  • Posts: 23
    • View Profile
Re: Removing Cobbled up Flywheels
« Reply #20 on: August 21, 2011, 04:14:17 AM »
Thanks for the "how-to" for pics.  I'll give it a go.

Here's the latest. It's been a roller-coaster to say the least.  As you may recall the gib key on the left (fuel pump side) flywheel (FW) has been removed.  Last I wrote I was applying pressure to the right gib-key.  Before going to work I gave the jacking screws about 20 degrees rotation and I heard a PATING, clatter as the head of the gib key seperated and hit the barn siding and skittered around the floor.   Good-news: the key puller is undamaged.   So I went back to work on the left FW.

A buddy of mine had a bearing seperator and a couple of gear pullers so I bought some 5/18-18 threaded rod and hooked the two together as shown .  After letting it stand tensioned overnight with KROIL, I disassembled and applied anti sieze compound on the threads and on the thrust washers.  After snugging everything up I rotated 7 flats.  Then I did what my friend suggested, I give the center jacking screw a firm hit with my 2lb sledge.  When I did it the FW rang and then immediately stopped.  I noticed  the  hub moved the tiniest amount. Rotated another flat on both of the outside jacking nuts and a whack to the center jacking screw and it moved again this time more.   I continued to do this until the hub was 1/4 closer to the end of the shaft and I realized I was bending the bearing seperator bolts. I removed the bearing seperator and will be jacknig the FW off tomorrow.  Daughter's birthday today.

I feel lucky its moving, the rght side looks like it is firmly brazed to the shaft 
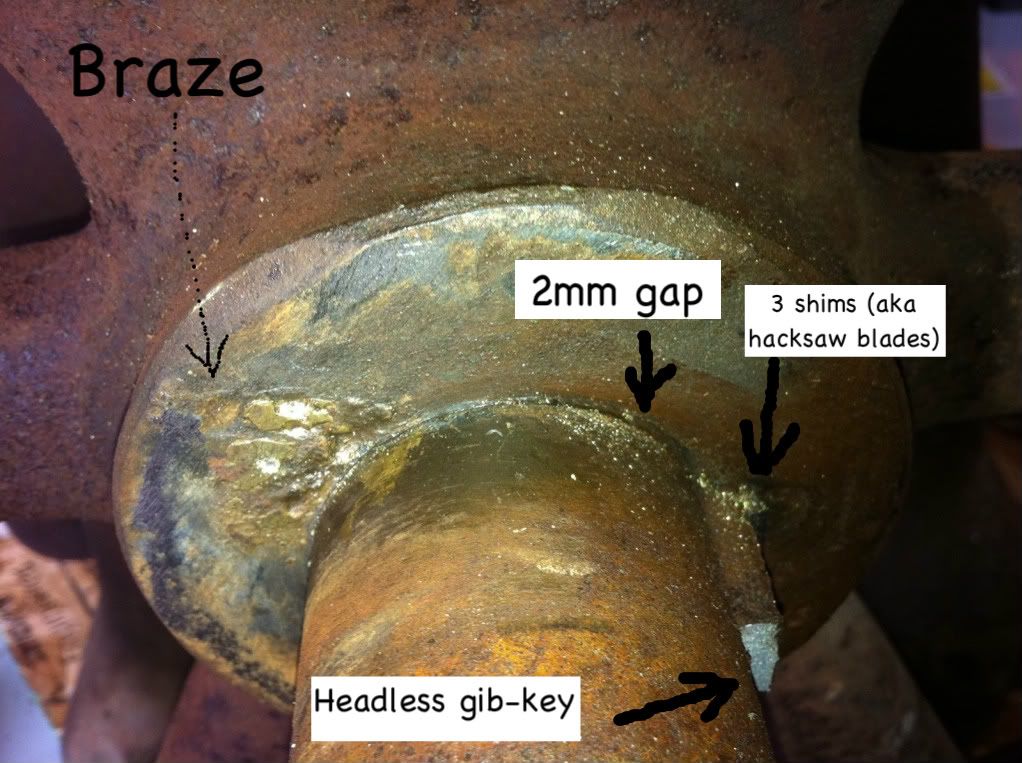
.   I didn't notice until today that there is a 2mm gap between the shaft and FW hub on the right side.   I have to get the key out first.  I'm planning on welding a threaded rod to the key and using it to make a slide hammer.     

1932 5hp CS (recond parts)
1958 8hp CS (mostly assbld)

piperpilot3tk

  • Full Member
  • ***
  • Posts: 195
    • View Profile
Re: Removing Cobbled up Flywheels
« Reply #21 on: August 21, 2011, 09:31:31 PM »
Good luck with that.  You really should polish all the corrosion off of the crankshaft before you drag the flywheel off of it's clean spot and onto a rusty dirty section and lock it up for good.

Brinkjr

  • Newbie
  • *
  • Posts: 23
    • View Profile
Re: Removing Cobbled up Flywheels
« Reply #22 on: August 21, 2011, 10:01:51 PM »
Thanks for the advice.   What is a good technique for removing corrosion on the crank??   I used sand paper and a small file 3/8 wide 4" long to get the rust off the left side.   What works better
?   Do you go until the shaft is tOtally grey?
1932 5hp CS (recond parts)
1958 8hp CS (mostly assbld)

piperpilot3tk

  • Full Member
  • ***
  • Posts: 195
    • View Profile
Re: Removing Cobbled up Flywheels
« Reply #23 on: August 21, 2011, 10:16:50 PM »
Sandpaper and a file work well.  Yes you should keep going untill you get all the corrosion off, then polish the shaft with fine sand paper.

rleonard

  • Hero Member
  • *****
  • Posts: 589
  • Mattoon, Illinois
    • View Profile
Re: Removing Cobbled up Flywheels
« Reply #24 on: August 22, 2011, 03:00:15 PM »
So does an angle grinder with a wire brush.
Faster - Better - Cheaper  You can have any two, but not all three

carlb23

  • Hero Member
  • *****
  • Posts: 527
    • View Profile
Re: Removing Cobbled up Flywheels
« Reply #25 on: August 22, 2011, 03:25:24 PM »
So does an angle grinder with a wire brush.

I'll Second that


Carl

dieselgman

  • Hero Member
  • *****
  • Posts: 3189
    • View Profile
    • Lister Parts
Re: Removing Cobbled up Flywheels
« Reply #26 on: August 22, 2011, 03:30:40 PM »
We use a long strip of fine sandpaper/emory cloth of the type used for crankshaft journal polishing. Removes rust and high spots, leaves the base metal pretty much unscathed.

Gary
ALL Things Lister/Petter - Americas
Lyons Kansas warehousing and rebuild operations

aqmxv

  • Sr. Member
  • ****
  • Posts: 271
  • Duty Now for the Future
    • View Profile
Re: Removing Cobbled up Flywheels
« Reply #27 on: August 22, 2011, 10:49:30 PM »
Yes, get the rust down to bare steel on the high spots of the crank or you'll never get that flywheel off.

Once you've got the engine apart, I recommend you look into electrolytic derusting for rust removal - easier and works better than anything else (other than Evapo-Rust) that I've tried.

http://www.stovebolt.com/techtips/rust/electrolytic_derusting.htm

http://www.spaco.org/Blacksmithing/Rust/ElectrolyticDerusting.htm

http://www.icehouse.net/overland/derusting.html

http://www.instructables.com/id/Electrolytic-Rust-Removal-aka-Magic/

and the reference:

http://nautarch.tamu.edu/crl/conservationmanual/File10a.htm

You'll need a big container for the large parts, but it's definitely worth the trouble, and it will probably keep you from having to machine anything down.
6/1 Metro IDI for home trigen

dieselgman

  • Hero Member
  • *****
  • Posts: 3189
    • View Profile
    • Lister Parts
Re: Removing Cobbled up Flywheels
« Reply #28 on: October 01, 2011, 02:35:51 PM »
Interesting, first I've heard of that and sounds cheaper than Evaporust by a long shot! Looks like a fair amount of effort but I'll have to study it a bit more. One big problem we've tried to solve - rust inside fuel tanks... short of discarding the tanks, it would be nice to have a working solution for this common problem. I wonder if the electrolysis would work internally.

dieselgman
ALL Things Lister/Petter - Americas
Lyons Kansas warehousing and rebuild operations

cgwymp

  • Full Member
  • ***
  • Posts: 133
    • View Profile
Re: Removing Cobbled up Flywheels
« Reply #29 on: October 01, 2011, 07:10:19 PM »
I've used it on MG parts and it works well. It's mostly a line-of-site process but I don't see why it wouldn't work internally. Hook the negative lead to the tank and the positive lead to your electrode which you lower into the filler neck, making very sure that it doesn't touch anything. The tank will be filled with the electrolytic solution of course. Turn on the juice and walk away for a few days. Keep in mind that the process generates hydrogen. The probability of igniting it I would think would be very very low but non-zero. Do your derusting in a drafty room. ;-)
Listeroid 8/1