Puppeteer

Author Topic: KOEL 8/1 Project  (Read 57857 times)

OKFarmer

  • Jr. Member
  • **
  • Posts: 73
    • View Profile
KOEL 8/1 Project
« on: July 13, 2012, 04:10:35 AM »
Making some Progress on the Kirloskar 8/1 with ST5 project.

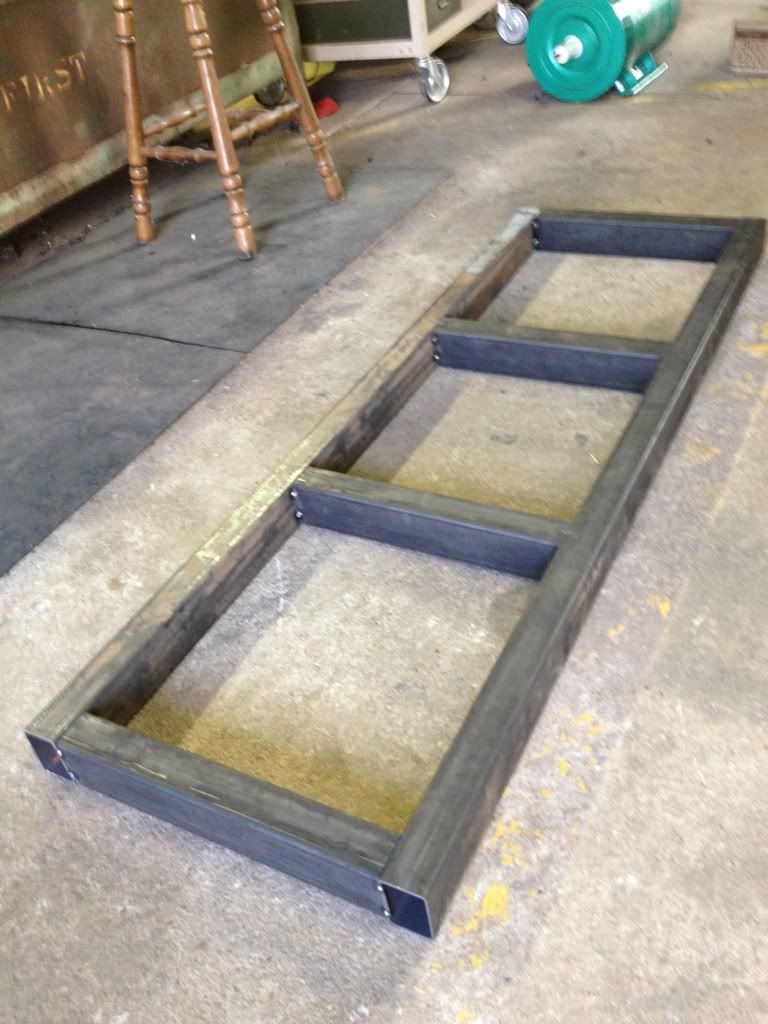
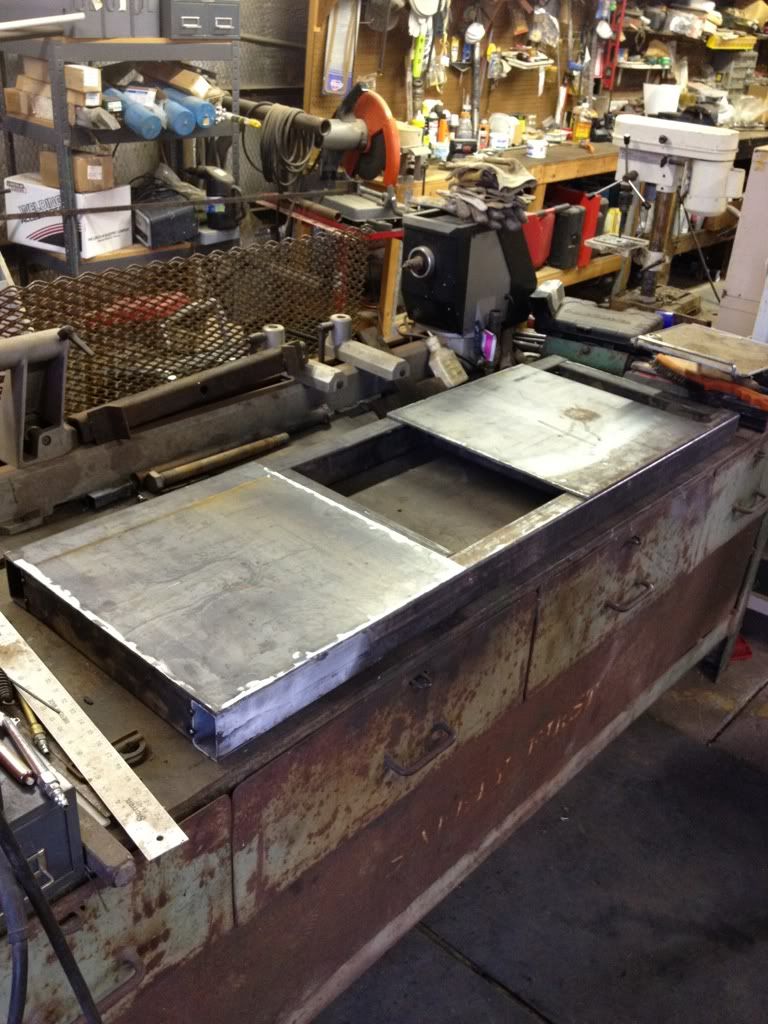
I laid out and tacked together the subframe. It's from 2" x 3" thick wall. Dimensions are 20" x 60". I also cut out 2 20" x 20" plates from 3/16" material for bases.
Here's a pic of the frame:


Here is pic of the plate laying on the frame:


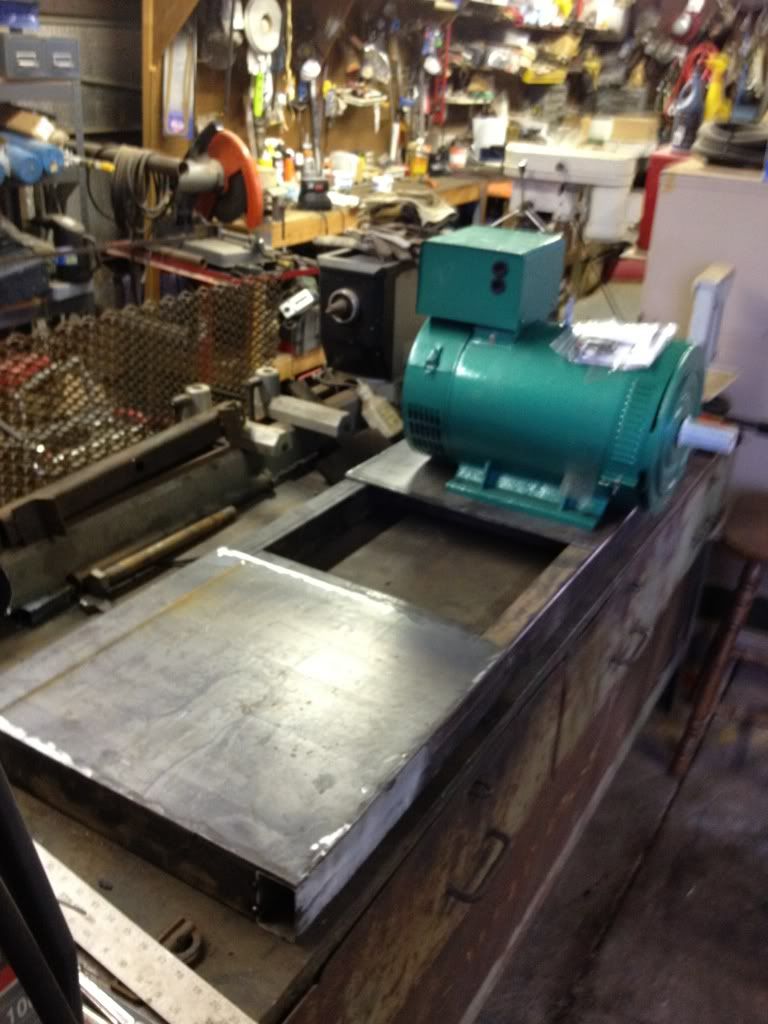
Here is a pic with the ST5 genny sitting on the frame for some measurements:


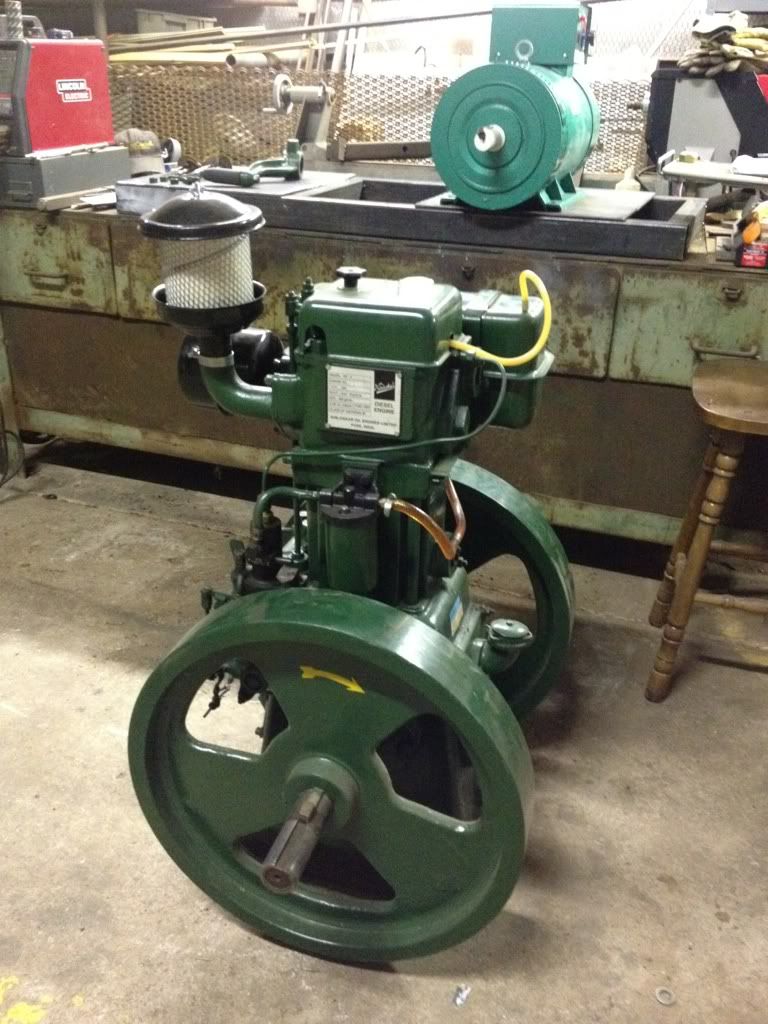
I also got the lister off of the crates and packing. I started her for a second just sitting on the shop floor. It scooted a little but would pretty much just sit there and pop...pop...pop away.

It looks as though for belt clearance, unless I build up a base to bolt to, I am going to have to offset the engine and genny head to one side of the frame. Allowing the flywheel and generator pully to hang over the side. Anyone have any thoughts on this or anything you see in the pics?

One last pic of her on the floor with no packing (this pic also shows my air filter mod):

dieselgman

  • Hero Member
  • *****
  • Posts: 3189
    • View Profile
    • Lister Parts
Re: KOEL 8/1 Project
« Reply #1 on: July 13, 2012, 04:20:04 AM »
Looking good! I believe there should be clearance for your belt/s, but most setups I have looked at have the flywheels in the clear, narrow baseplates.

dieselgman
ALL Things Lister/Petter - Americas
Lyons Kansas warehousing and rebuild operations

Tom

  • Hero Member
  • *****
  • Posts: 1746
  • Green power is good.
    • View Profile
Re: KOEL 8/1 Project
« Reply #2 on: July 13, 2012, 05:49:31 AM »
If I may offer a suggestion, well even if I may not here it is.  ;) You might want to add a couple of length's of 3" channel or 1/4" angle iron under the engine mounting plate. Position the braces so that the mounting bolts for the engine go through additional bracing. This will prevent the engine from acting like a 800 lb drum stick on the mounting plate.
Tom
2004 Ashwamegh 6/1 #217 - ST5 just over 3k hours.

OKFarmer

  • Jr. Member
  • **
  • Posts: 73
    • View Profile
Re: KOEL 8/1 Project
« Reply #3 on: July 13, 2012, 02:44:22 PM »
I can remake the frame pretty easily to be more narrow. Or I may just offset the gen head drive side to hang past the side.

Tom, I get what you are saying. I think my engine will acually straddle one of the crossmembers that is already there. I'm going to slide the plate on the engine end of the sled more toward the center making the plate centered on the that next cross member. I can run a piece of angle under the edges of the plate for some additional rigidity.  Didn't think about that engine flexing a 20 x 20 x 3/16 piece that is wleded all the way around.

Question: Facing the flywheel on the injector pump side of the engine would you locate the head on the left or right of the engine. I notice in a LOT of the pics everyone always puts the head to the right, but that is where the radiator will be above the head. Water and electricity don't go well together so I was thinking put the head to the left (exhasut and intake side).

Thoughts?

ronmar

  • Hero Member
  • *****
  • Posts: 1227
    • View Profile
Re: KOEL 8/1 Project
« Reply #4 on: July 13, 2012, 03:30:36 PM »
I can remake the frame pretty easily to be more narrow. Or I may just offset the gen head drive side to hang past the side.

Tom, I get what you are saying. I think my engine will acually straddle one of the crossmembers that is already there. I'm going to slide the plate on the engine end of the sled more toward the center making the plate centered on the that next cross member. I can run a piece of angle under the edges of the plate for some additional rigidity.  Didn't think about that engine flexing a 20 x 20 x 3/16 piece that is wleded all the way around.
Straddling the crossmember is no good.  The feet on the casting are probably lower than the rest of the base, so the engine forces will still be applied to sheetmetal.  Thicker sheetmetal, but still sheetmetal.  You realy need the mount bolts to pass thru structural steel...

Question: Facing the flywheel on the injector pump side of the engine would you locate the head on the left or right of the engine. I notice in a LOT of the pics everyone always puts the head to the right, but that is where the radiator will be above the head. Water and electricity don't go well together so I was thinking put the head to the left (exhasut and intake side).

Thoughts?

When viewing as you describe, from the IP side, I would put the generator head to the left(intake/exhaust port side).  The reason for this is that the crankcase access port is on the other side(coolant port side of the engine).  Any engine work, such as a teardown means accessing that cover to get to the crank.  Way easy setting on a bucket in front of an easilly accessed door.  Not so easy having to lean in over the top of the generator case.  The coolant ports are also on that side.  Imagine a coolant leak over the top of your generator head?  The crankcase vent is also in that crankcase access door.  It will puff combustion gas and oil vapor, which is probably something best kept separated from the generator head. 

I would also reccomend a 12" tall concrete mounting baseblock under your frame.  Getting the frame up off the ground about a foot makes working on things SOO much easier.  It also makes starting a lot easier.  I did all my overhaul and balancing work with the frame on the garage floor.  I mounted the frame up on top of about a 10" thick concrete step pad I recycled.  Night and day difference in ease of starting and maintenance with just 10" of vertical repositioning... 
PS 6/1 - ST-5.

Tom

  • Hero Member
  • *****
  • Posts: 1746
  • Green power is good.
    • View Profile
Re: KOEL 8/1 Project
« Reply #5 on: July 13, 2012, 05:22:02 PM »
+1 and +1 on what Ronmar said. Here is how I did my frame and base.


Also you might want to fill those steel tubes with concrete for some additional rigidity.
« Last Edit: July 13, 2012, 05:24:42 PM by Tom »
Tom
2004 Ashwamegh 6/1 #217 - ST5 just over 3k hours.

OKFarmer

  • Jr. Member
  • **
  • Posts: 73
    • View Profile
Re: KOEL 8/1 Project
« Reply #6 on: July 13, 2012, 06:27:15 PM »
Tom and Ronmar, Already planning the concrete block.  Ineteresting use of the timbers. I've thought about the same thing my theory being the wood would absorb some of the thump. As the wood compresses do you have to keep tightening bolts?

I understand you both on bolting to structural. I'll be sure and add what I need to do that.

Very clean installation Tom! I'm impressed and inspired! I think I may narrow up my sled to fit between the flywheels. It will just look/work better.


BruceM

  • Hero Member
  • *****
  • Posts: 3054
    • View Profile
Re: KOEL 8/1 Project
« Reply #7 on: July 13, 2012, 08:43:27 PM »
My temporary wood test base is still going strong after over 6 years and 2300 hrs.  (Metro 6/1 driving ST-3 and air compressor).  Balancing the engine makes all the difference, I think.   My engine is attached via long lag screws, and no, I haven't had to tighten them since the 200 hr mark. 

I'd rather have a nice steel base if one was given to me, but am not in a hurry to replace something that works OK and seems to be holding up just fine.  I really like Tom's steel clad- wood beam design, also.

Tom

  • Hero Member
  • *****
  • Posts: 1746
  • Green power is good.
    • View Profile
Re: KOEL 8/1 Project
« Reply #8 on: July 13, 2012, 09:48:17 PM »
Inspired is good! The tie down bolts were tightened a couple of times during the first year/200 hours of operation. Since then they have been plenty tight every time they've been checked.
Tom
2004 Ashwamegh 6/1 #217 - ST5 just over 3k hours.

OKFarmer

  • Jr. Member
  • **
  • Posts: 73
    • View Profile
Re: KOEL 8/1 Project
« Reply #9 on: July 15, 2012, 10:51:37 PM »
So I will be putting the 8/1 in the middle of the sled. Radiator to the right. Gen head to the left. Never the two shall meet.

Below I have attached a photo. It's kind of a hybrid of Tom's sled, and Bruce's "temporary" mounting base. I placed two heavy 3" angle irons across the middle section. Inside those and the section of the frame they parallel I have placed 4 x 4 timbers. do I cap them with steel? Or let the lister sit directly on the timbers and "settle" in. I'll have a lag coming from the angle iron below, through them timber, then through the lister. I will tighten the lister down to the timbers with double nuts that I can tighten as it settles a little.  If the timbers become worn or decompose I can replace them by picking the lister up.

There are red x's where the holes would be in the timbers.

OKFarmer

  • Jr. Member
  • **
  • Posts: 73
    • View Profile
Re: KOEL 8/1 Project
« Reply #10 on: July 16, 2012, 05:11:13 PM »
Any thoughts on the timber steel hybrid? Should I cap the timber in steel too? Or set the lister directly on the timber?

Tom

  • Hero Member
  • *****
  • Posts: 1746
  • Green power is good.
    • View Profile
Re: KOEL 8/1 Project
« Reply #11 on: July 16, 2012, 06:18:08 PM »
Well, I'd cap it with steel. It will spread the torque over the surface of the wood and minimize settling. This depends a bit what kind of wood you are using too. With a good solid wood like oak probably not necessary, with doug fir maybe more so.

One of the things I did which may or may not be necessary is to run carriage bolts up through the bottom of the frame. That way if one of the nuts came loose, at least the engine is still pinned in place. On my frame the carriage bolts just go through the channel iron. There is a dimple in the timber underneath the bolt to capture it.

My engine was initially used to power the construction of our home. While it was doing that job the frame was lag bolted to some redwood logs as skids since it was not on a permanent base.
Tom
2004 Ashwamegh 6/1 #217 - ST5 just over 3k hours.

BruceM

  • Hero Member
  • *****
  • Posts: 3054
    • View Profile
Re: KOEL 8/1 Project
« Reply #12 on: July 17, 2012, 02:05:33 AM »
+1 for Tom's advice.  Your Doug Fir beam looks adequate, but a steel cap would be nice and also sturdier.  I didn't only because I never expected to use my wood base as a permanent fixture.

OKFarmer

  • Jr. Member
  • **
  • Posts: 73
    • View Profile
Re: KOEL 8/1 Project
« Reply #13 on: July 18, 2012, 05:13:27 AM »
So how is this looking?


Tom

  • Hero Member
  • *****
  • Posts: 1746
  • Green power is good.
    • View Profile
Re: KOEL 8/1 Project
« Reply #14 on: July 18, 2012, 05:35:22 PM »
So how is this looking?


Like text.  :)
Tom
2004 Ashwamegh 6/1 #217 - ST5 just over 3k hours.