Author Topic: Use of Plastigauge  (Read 24310 times)

Eadie McCreadie

  • Full Member
  • ***
  • Posts: 153
    • View Profile
Use of Plastigauge
« on: November 03, 2008, 06:16:37 PM »
Not sure if this stuff is available in the US, I guess so, perhaps under a different name.

Anyway, I used it for the first time, today, to measure, or attempt to measure the big end shells on y 6/1 'oid.

The gap is meant to be three thousandths of an inch.

Please look at this photograph:


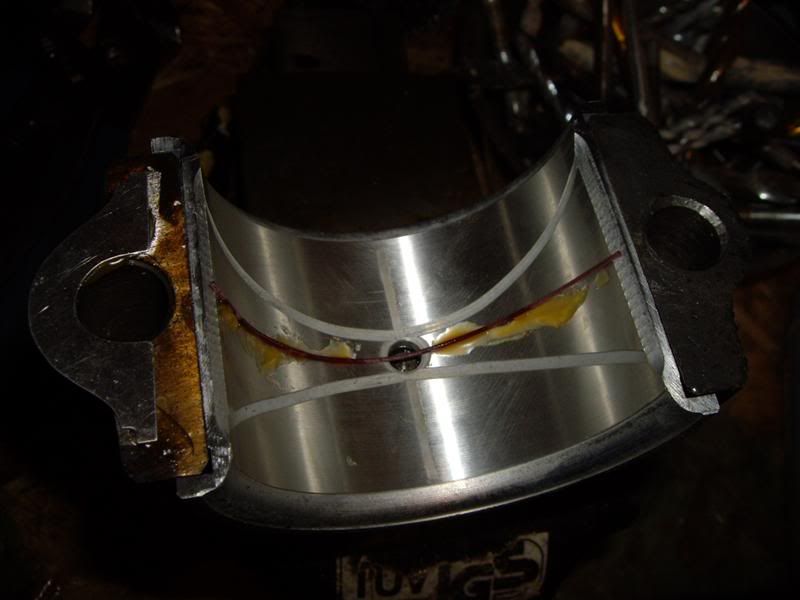
It shows the lower shell withthe strip of gauge material in place, held there by a smidge of grease.

When I tightened to the recommeneded torque, and undid the shells, the material was badly smudged.

So much so that I felt that I could not take an accurate measurement.  So I did the procedure once more, and came up with this:  Yes, the Plastigauge is in a different position on the shell, but I don't think that makes any difference.  Photo:


Do you read that card to say that the gap is indeed three thou?  I do.  The things is that the Plastigauge material got spread about somewhat - I think by the turning of the crank to get the torque wrench into position on the other side of the engine casing this might have messed it up a bit?

Thoughts on my first use of Plastigauge?

Many thanks

Tim ('Eadie') McCreadie
6/1 oid.

Eadie McCreadie

  • Full Member
  • ***
  • Posts: 153
    • View Profile
Re: Use of Plastigauge
« Reply #1 on: November 03, 2008, 06:21:00 PM »
Just as an aside, this is the conrod end of things - after the shell was removed.  That looks like heat damage to me, after my oil ran low... could this be detrimental to the engine's lifetime?

The big end cap did not have this appearance.  I'd already about the top shell of the big end sufferin more damage than the lower in these cases of oil starvation.

6/1 oid.

wrightkiller

  • Hero Member
  • *****
  • Posts: 843
    • View Profile
Re: Use of Plastigauge
« Reply #2 on: November 03, 2008, 06:53:11 PM »
Remove the engine sump cover to reveal the big-end and its retaining con rod. Remove surplus oil and release the big-end shells by unscrewing the nuts. Apply a smear of grease to the journal and small quantity of silicone release agent to the shell.

Trim a length of PLASTIGAUGE                                {  to fit across the journal   }          using the grease to hold it in place. Replace the shell and tighten the nuts to the recommended torque setting                              { without rotating the  the crank }
Now remove the shell to reveal the PLASTIGAUGE which will have been spread across the bearing surface as a stripe or band. Match the width of the stripe against the calibrated gauge card supplied and read off the clearance.

you should remove the PLASTIGAUGE stripe with a clean oily cloth or industrial de-greasing solvent, 


« Last Edit: November 03, 2008, 07:12:17 PM by wrightkiller »

1958steveflying

  • Jr. Member
  • **
  • Posts: 97
    • View Profile
Re: Use of Plastigauge
« Reply #3 on: November 03, 2008, 06:54:39 PM »
The Plastigauge should be put across the shell at the bottom as you look at it and not around the shell.
  Steve

oliver90owner

  • Hero Member
  • *****
  • Posts: 861
    • View Profile
Re: Use of Plastigauge
« Reply #4 on: November 03, 2008, 08:41:52 PM »
Yes indeed that looks like heating effect to the shell insert.  It would have got hot enough to melt the big end white metal and looks as though it may have run crank to backing metal?  I would have thought the crank would have taken a hammering if that was the case.  We do not know how much heat was transferred to the conrod but I doubt it was enough to compromise it unless it occured for some time.  Crank scoring would probably result in these circumstances.

To your use of plastiguage; this material certainly was not available for use when these engines were in their prime.  Is your big end shimmed for clearance?  If so, measure for roundness (or ovality).  If it is within specs, remove shims until the bearing goes tight.  That is zero clearance and not enough;  you can carefully check it is evenly tight across the bearing with engineer's blue (to check for taper across the bearing) then as long as all is well simply add shims, as necessary, to the minimum thickness required for the bearing to be free - free in the complete turn of the rod (or crank).  End of job.

It would appear that you are repairing without crank removal.  If the bearing or the crank is out of round your reading with plastigauge may well give a poor indication of the truth.  You should repeat it with the crank turned 90 degrees.  It is better to do this with the crank removed so that any high spots can be found more easily.

Not having the engine in view, not knowing the complete circumstances of the failure (the evidence), it is difficult to guess how much damage there may be.  Certainly 'repairing' without knowing the full extent of any situation is possibly inviting trouble in the future.

Does this engine have TRB main bearings?  If so has your crank end-play increased markedly?  They are renowned for toughness but dependant on circumstances (time,original bearing size and quality, end float, etc) these may need attention as well.  Am I to understand your big ends are not splash fed from a tray (with a weir)?  Lister engines were designed so that the oil level could run right down to the pump inlet before any lubrication deficiences occurred.  Some 'oids do not have that back-up.  Yours may be one of these, I don't know.

I think the longer you go with this engine and the more experience you acquire of rebuilding it, the more likely you are to pick up a proper Lister and cut your losses with this engine.  If the previous paragraph describes your engine you may seriously need to install a low lube level cut-out for the engine.

Regards, RAB

Eadie McCreadie

  • Full Member
  • ***
  • Posts: 153
    • View Profile
Re: Use of Plastigauge
« Reply #5 on: November 03, 2008, 09:48:32 PM »
Thanks for the replies.

I don't have pictures to hand of the old shells - they were extremely worn down, altough you could mkae out the ghosts of the oilways.

The big end was shimmed with one shim on delivery, and I have replaced it with a new one and carried out the Plastiguage test/measure.

I, too, am unsure of the exact reason for this problem.  I do know that the engine was running on wvo, and had been for about an hour previously.  I found the piston rings to be all gummed up in a huge way.  I suspect that I failed to warm the wvo properly prior to the injection.  What effect this had I don't know.

It may be that there is something happening in the use of wvo to gum up the rings, for all I know.  That is my strongest suspicion.  Other things I have been up to include varying the loads on the engine in pursuit of finding a suitable running speed/energy consumption.  I'm unhappy about the location of the exhaust also - it runs upwards from the outlet rather than horizontally or downwards, and I have read about acidic gas products running back into the head and ...  This is on my to-do list.

Engine has TRBs.  I can't detect any movement, but then again I find it hard to shift two flywheel laterally anyway.  Would they move, in a way that I could detect by hand?  There's an oil dipper on the bottom of the big end for lubing.  It dips into a tray and there's a deeper reservoir where the oil is picked up by the oil pump for lubing the top end.

Thanks for the assessment.  I know it's not easy to give an opinion on something you can't see for yourselves.  Must even harder with a n00b like me just relying on a pretty weak engineering backgound (ie non-existent!).

6/1 oid.

Wizard

  • Full Member
  • ***
  • Posts: 135
    • View Profile
Re: Use of Plastigauge
« Reply #6 on: November 03, 2008, 11:27:34 PM »
Bluing on the parts means temper and strength is lost.  Get another con-rod and replacement bearings, crank and bearing shells.

Sorry to say this bad news.

Cheers, Wizard

lendusaquid

  • Sr. Member
  • ****
  • Posts: 353
    • View Profile
Re: Use of Plastigauge
« Reply #7 on: November 03, 2008, 11:43:28 PM »
How thick are the Indian shims?.The ones i had were about 8 thou which is far to much. Make some more shims up out of beer cans.The cans i used were about 2-3 thou.You should be able to get at least one shim out of a beer can and your  need at least half a dozen :).Use RAB,s method adding shims evenly to both sides until it turns freely. 3thou is MAX, you want less if possible.

xyzer

  • Hero Member
  • *****
  • Posts: 1058
    • View Profile
Re: Use of Plastigauge
« Reply #8 on: November 04, 2008, 04:44:35 AM »
There's an oil dipper on the bottom of the big end for lubing.  It dips into a tray and there's a deeper reservoir where the oil is picked up by the oil pump for lubing the top end.
Eadie,
I am going to assume your engine is a Indian "Listeroid" with TRB's. Was the crankcase completely cleaned before it was put into operation? Was the rod bearing replaced before use started? If not I personaly believe most bottom end failures are cause by the Indians unsanitary engine assembly. The bottom end on the "Listeroids" takes a lot of flack for there design even though it is basically the same as the true Lister. I truly believe after owning 2 "Listeroids" and the many post here that sand is somewhere in all of them. Did you feel any grit while you were working on it? The ring issue I don't believe is related to the rod bearing failure. Probably a WVO issue and I know little of the issues using it can cause. The rod discoloration would not concern me. You said "the oil is picked up by the oil pump for lubing the top end." Did you mean mains?
 Most "Listeroids" I have seen the oil pump, pumps oil to the TRB's that really don't need the extra oil (doesn't hurt either). It is a holdover from the shell type Lister mains that could use the extra lube.
« Last Edit: November 04, 2008, 04:47:08 AM by xyzer »
Vidhata 6/1 portable
Power Solutions portable 6/1
Z482 KUBOTA

Eadie McCreadie

  • Full Member
  • ***
  • Posts: 153
    • View Profile
Re: Use of Plastigauge
« Reply #9 on: November 04, 2008, 07:31:28 AM »
Again, thank you for replying.  So much difference of opinion!

I'll check the shims later.  For the Plastigauge measurement above, I had put one shim in place.

xyzer - yes, it's a Powerline 'oid with TRBs.  On delivery I took the top end apart and checked by hand (poking a screwdriver into the crankcase crevices to check for sand.  I was as thorough as I thought I could be, but didn't strip it completely and pressure clean it.  In fact I found no sand or other grit in there at all.

I certainly did not replace the big end shells at that time.

What I meant by "the oil is picked up by the oil pump for lubing the top end" was that the main bearings are lubed in this way, yes.
6/1 oid.

xyzer

  • Hero Member
  • *****
  • Posts: 1058
    • View Profile
Re: Use of Plastigauge
« Reply #10 on: November 06, 2008, 02:23:58 AM »
Tim,
It sounds like you did a good look over before you put your engine to service and are doing it right on the forced repair. The reason I mentioned looking at the rod bearing before you started it is some engines are test run at the factory with the oil from the previous test run and so on. The problem oil is passed on and if there was sand in it yours would get a dose.....maybe.... I would have to say you are doing everything right on the repair. How is the finish on the rod journal? The smoother it is the better. There are some techniques used to polish it while still installed that might help it out. I do sell the hollow dipper that allegedly might supply more oil to the bottom end. Maybe it would help maybe not....you can check the link out
....Good Luck!
http://listerengine.com/smf/index.php?topic=1287.msg16816#msg16816

Dave
Vidhata 6/1 portable
Power Solutions portable 6/1
Z482 KUBOTA

Eadie McCreadie

  • Full Member
  • ***
  • Posts: 153
    • View Profile
Re: Use of Plastigauge
« Reply #11 on: November 06, 2008, 08:26:47 AM »
Thanks Dave,

I nearly had the engine back together when I managed to break the oil control ring!

This is the second time I have done that.  I was putting the piston into the sleeve from underneath when the fourth ring was in, the cylinder slipped from my grasp and smashed the oil ring.

I do have a ring compressor, but I couldn't see how to use it properly, so I resorted to pushing the rings in by hand and letting gravity help.

Tim
6/1 oid.

carlb23

  • Hero Member
  • *****
  • Posts: 527
    • View Profile
Re: Use of Plastigauge
« Reply #12 on: November 06, 2008, 01:27:38 PM »
Thanks Dave,

I nearly had the engine back together when I managed to break the oil control ring!

This is the second time I have done that.  I was putting the piston into the sleeve from underneath when the fourth ring was in, the cylinder slipped from my grasp and smashed the oil ring.

I do have a ring compressor, but I couldn't see how to use it properly, so I resorted to pushing the rings in by hand and letting gravity help.

Tim

Tim,

I have found the using a two pair of vise grips on two studs just below the cylinder will prevent the cylinder from sliding down breaking the ring (i also found this out the hard way by breaking the oil control ring) I start with the cylinder down low enough so that with the piston at TDC the oil ring is up in the cylinder bore. I then lower the piston and start to install the compression rings, using slight upward pressure on the piston using the flywheel to control the piston position and just work the ring in. This method allows me to control the relationship between the cylinder and the piston/rings. After all of the rings are in the cylinder I remove the vise grips and lower the cylinder down. 

I hope this helps.


Carl

Eadie McCreadie

  • Full Member
  • ***
  • Posts: 153
    • View Profile
Re: Use of Plastigauge
« Reply #13 on: November 06, 2008, 01:54:13 PM »
Thanks Carl, I'll try that.

Tim
6/1 oid.

xyzer

  • Hero Member
  • *****
  • Posts: 1058
    • View Profile
Re: Use of Plastigauge
« Reply #14 on: November 06, 2008, 03:03:44 PM »
Tim, Carl,
I have always put the piston into the cylinder rod first while the cylinder was on setting on the block with a rag wraped around the journal. Never had a problem. The oil ring is the first one in and I believe it has more drag than the others....maybe maybe not?! Both of my rod ends fit into the cylinder, one just barely but it did and a file on the edges fixed that. Have you got a spare Tim or do you have to order a set? Good Luck!
Dave
Vidhata 6/1 portable
Power Solutions portable 6/1
Z482 KUBOTA