Show Posts

This section allows you to view all posts made by this member. Note that you can only see posts made in areas you currently have access to.


Messages - Dieselsmoker

Pages: 1 [2] 3 4 ... 10
16
Original Lister Cs Engines / Re: Another 6/1 Restoration
« on: January 06, 2018, 08:30:44 PM »
This update is waaaaay overdue. Been on holiday and without any photographic material I dared not post anything!  :)
 
Milestone met! The genset is good enough to show off and it works 100%.
There are only a few more boxes to tick to get to exactly where I want to be - for now I am however content with where I am with the project.

It's been an interesting journey to get the electrics sorted... With the Arduino fried the next option was to go analogue. Thanks again to BruceM for the advice and encouragement.

Circuit operation in a nutshell: Voltage coming from the alternator is scaled down to 12V and monitored by op-amp comparitors. As soon as either adjustable over- or under voltage thresholds are exceeded, the circuit energises a power relay to shed the load going to the plug outlet. There is a time dealy build in to filter out dips and spikes. When the fault condition is resolved, the circuit can be reset to connect the load again. There is a switch in the panel where the monitoring circuit can be switched off - with the power relay wired N/C the circuit can thus operate without intervention. The green LED on the panel door indicates that voltage monitoring is active.
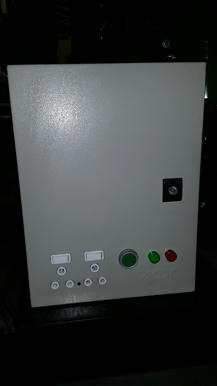
From left to right:
Plug outlet.
Non-latching pushbutton to reset trip.
Green LED - Voltage monitoring active.
Red LED - Output tripped.


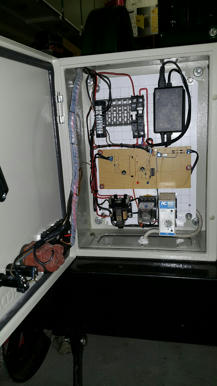
Complete circuit assembly:
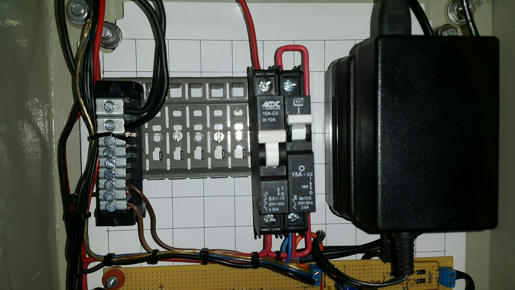

From left to right:
Neutral bar.
Main circuit breaker.
Voltage monitoring circuit breaker (On/Off).
2x transformers:
     One is to scale 230V to 12V for input into the comparitors.
     The other is 230V to 18V to power the delay-on relay.


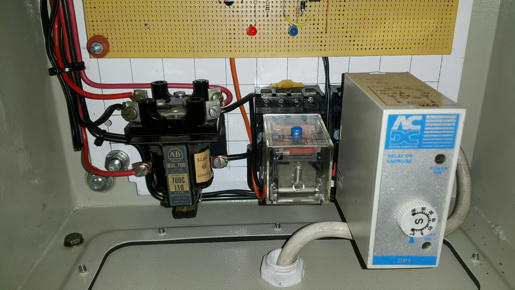
The brains of the circuit:
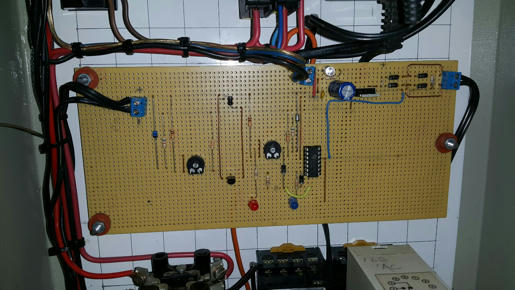

From left to right:
Power relay to disconnect load. (230V Coil).
12V relay controlled by the delay timer. These contacts operates the power relay.
Delay-on timer triggered by the voltage monitoring circuit.


A brief demonstration:
https://youtu.be/vpnZOMdcmFM

For the alternator connection box I also made a cover. Found some plate in the shed and some heavy hammerblows later I had the cover.


On the way back from our coastal holiday, we made a road trip of the 1300Km journey back home. We stopped at a couple of interesting places and avoided the main roads so we could pass through some small towns. In one of these towns called "Willowmore" we browsed through some antique shops. In one of these shops I found a Lister Diesel tank, exactly the same as the one I have, in the back of a dark shelve  ;D The tank is beyond repair, but the Lister cap is intact! Of course it had to come home with me. In no time I had it cleaned up and the piece of crap chinese-made cap  was chucked sidways!


My to-do list to round the project off:
Guages in the panel door. (Volts, Amps, Hour meter, Frequincy)
Probably paint the panel green.
Gib head key covers.
Rocker bushes. (I'll turn these myself)
TAKE IT TO A SHOW!

17
Original Lister Cs Engines / Re: Lister 12/2 Rebuild Update
« on: December 06, 2017, 07:22:06 AM »
Yes, thanks...  I hand painted the lettering, but it's raised (cast) printing, so that made it pretty easy!

Hi Samo.
Looks great!

Did the Lister engines come out of the factory with gold lettering, or is it your own personalized touch?

18
Everything else / Re: 12VDC to 220VAC UPS Inverter
« on: December 06, 2017, 07:12:54 AM »
 :D enjoyed the video and the write-up.
You nailed a couple of points squarly in your video - I had a good chuckle  ;)
Thanks for sharing!

19
Everything else / Re: 12VDC to 220VAC Inverter
« on: December 05, 2017, 06:55:14 AM »
I have a couple of converted UPS units I did this to years ago.
I expected nothing less from you glort ;)

A while back all the ups'es at work were changed out for new ones because the batteries were dead. Why the bateries were not just replaced is something for another topic - another day.... I kept two of them in my office and recently I learned that the rest were scrapped!! I nearly fainted - but luckily I saved the two... It freaks me out to see how things get wasted - especially in big companies where item value is expressed in %. When your maintenance budget runs into millions, nobody worries about a couple of ups'es.

I used some APC brand  and they have been great.  Taking out the buzzer is a great idea. Bloody things never seem to burn out no matter how many days they sit there annoying you!
This sound this particular model makes reminds one of a heartbeat monitor. We used these in the office at work so imagine how bad it is when 10 of these start beeping at the same time!!  >:( :-\ ??? >:( 

There are a couple of things with using these power supplies as inverters.....

Firstly, it's best to get " Cold start" I think they call it capable.  Ones that will start from battery power alone. My small APC's need AC power before they will fire up. A small inverter takes care of that but the inverter doesn't really like it so I disconnect as soon as the UPS wakes up. The bigger units all seem to be cold start so will fire straight off battery power. 
I have both of these types. I was lucky with this one that it can cold start as there won't be any mains power available to get it going. I guess one could modify it to be permanently switched to DC input. There is a very definate loud click from a relay when it switches over to DC power, so maybe therin lies the answer... 

Another and sometimes not easy thing is to see what battery voltage a unit needs. I got a few brand new Eaton UPS with good output only to discover they were all 96V input.  Even with small batteries that gets expensive to buy but I wanted to use car batteries for work in the field so they got onsold.

I would leave them charge capable. Connecting them to big batteries ( as In N200's) does Not hurt them at all, just takes a long time to charge the battery but they do a good job. They will float them nicely once they reach full charge and if you go into the setup through the computer attached to the UPS, you can ajust the voltages for  charging, upper and lower cut in and out limits and other things.

The beauty of the UPS units is they output a very clean and well conditioned supply that you can run anything off as long as it does not over load.
Good plan with the charging. I'll play with it and see what it does. It might just turn out to be the trickle charger I need to keep the John Deere battery alive  :)

20
Everything else / 12VDC to 220VAC Inverter
« on: December 04, 2017, 01:55:22 PM »
I'm just sharing this in case someone finds the information useful. I told a couple of people about what I did and nobody seems to have thought of this....

We are going away over the December holidays to an off-grid farm on the coastline. There is solar power for lights - but thats about it, so I made a 220V 360W Inverter using an old PC UPS. We can now charge phones and operate the jukebox and so on by connecting this to the solar battery. I've seen these laying around and maybe some of you can also breathe some usefull life back in these units.

The conversion is easy:
Dump the internal 12V 7Ah gel battery
Desolder and remove the piezo buzzer (if applicable)
Add leads and crocodile clamps to connect to the deep cycle battery. (Extend the leads that connected to the internal battery)
Remove or disconnect the mains input port - optional, but I removed it since the charging circuitry will probably eventually go up in smoke if someone tried to charge a big battery with it...  in theory it should work as long as it doesn't overheat.

Since I'll be vastly exceeding the original designed duty cylcle with the big battery, I also drilled some additional ventilation holes and added a 12V PC fan to keep things cool.

Here I'm testing it with a 220V 150W fan that was handy. It works great!

21
Original Lister Cs Engines / Re: Lister CS 6/1 as form of rehab
« on: December 04, 2017, 01:22:41 PM »
Nice rehabilitation project!
These engines all end up looking more or less the same after years of neglect - but I never grow tired watching them come back to life. Keep posting those updates.

Oh my word dieselgman... 10 engines... I feel like I need a break after doing just one   :o  ;D

22
Original Lister Cs Engines / Re: Another 6/1 Restoration
« on: November 15, 2017, 07:58:14 PM »
I've made some good progress with the voltage regulating circuitry. Thanks BruceM for all the help and advice thus far. I however must interrupt this topic to report back on the transfers that finally arrived. It was a looong 15 week wait... but well worth it.


23

Someone in here had a machine finished in (was it stove black?) and then coated with (boiled linseed oil?) - you can tell i have only a vague memory of it.  But it looked great!

That would be me... :laugh:
I stripped the Fairbanks-Morse down to bare metal as it was a lump of rust when I found it. I then assembled the engine and proceeded to polish it up with Zebo stove polish. I buffed off as much of the polish as I could once it dried, and then applied boiled linseed oil. It takes probably a week to dry. After some time the gloss fades and just the clear protective coating stays in place. I'm not sure exactly how durable the linseed coatings is, but with the engine kept indoors for the last 9 years it still looks great.

I think it's high time I pull this engine out and take some proper pictures of it. The only thing I have handy now is this link to a YouTube video I made a looong time ago with a terrible mobile phone.
https://youtu.be/CwWrmvpoE0E

On the Lister restoration I cleaned all the fasteners with a rotary wire brush. I then put them all in a tin and poured some linseed oil over them, took them out and let them dry to touch. Of course some of the oil stays inside the treads, but if you assemble within a week or two it's still soft enough to just get squeezed out. It won't give you a perfect finish like clear coatings, but also remember that since it (almost) never goes completely hard, it won't chip off like paint - which is a good thing. Added bonus is that I just love the smell of boiled linseed oil  8) 

EDIT:
Make this mental note - If you ever work with stove polish - wear plastic or latex gloves. If you think old diesel engine sump oil is black on your hands then you need to experience this stuff  :D

24
Original Lister Cs Engines / Re: Another 6/1 Restoration
« on: October 29, 2017, 07:18:34 PM »


Things don't always work out as planned it seems...

First setback was the overload breaker. I got a "normal" 10A breaker of the shelve and installed it along with a neutral bar to tidy the wiring up a bit. To test the breaker I fired up the engine and lined up some appliances to load the alternator with while giving the old girl some time to build up a bit of heat. Great anticipation sometimes leads to great dissapointment. The breaker reacts too slowley. As soon as the engine speed drops, the voltage drops and the current - well yes you get the picture. There is now way I can get the breaker to trip. Any ideas? I'm not sure if there are differently specced breakers available or if a smaller one will do the trick?

Second problem was the Arduino. I build some circuits on the breadboard and decided to o follow the route of full-wave rectification. If you look at the picture - on the left-hand side I took the 12V tap from the transformer and put it through a bridge rectifier and a voltage regulator with some caps to smooth things out to serve as a 5V supply to power the Arduino.

In the middle is a 5V relay that will eventually be used to operate the contactor.

On thr right-hand side the 6V tap on the transformer is rectified for measurement by the Arduino. The 50K pot is to calibrate the circuit so that the 5VDC that feeds into an analogue input can be calibrated to measure 250V @ 1024 bits. There is also a polarised cap and a 5V Zener in the mix before the signal gets fed into the Arduino. Simple. So it works, but the serial monitor sometimes reports some erratic results - not sure why yet, and I couldn't figure it out since the Arduino stopped accepting sketches getting uploaded  :'(  It looks serious... I think it's dead...

Bruce - your PM is on it's way. I'd like to have a look at what you have. It's gonna take a while to replace the Arduino.

25
Original Lister Cs Engines / Re: Another 6/1 Restoration
« on: October 25, 2017, 07:14:40 PM »
Thanks for the warning and saving me some school fees!  I never even considered the fact that a voltage monitor could be sensitive to waveform...

 
I use RMS calculation via AVR microcontroller (Arduino processor) for my inverter.  With the 10 bit A/D and rectified AC scaled to 5 V,....


I more or less follow what you are saying, but
Rectified AC? I suppose you halve wave rectify?
What do you mean with "scaled to 5V"? Did you just use a step down transformer?

Seems like I have a lot of reading ahead of me  ::)


26
Original Lister Cs Engines / Re: Another 6/1 Restoration
« on: October 25, 2017, 04:19:08 PM »
Ah! A partner in crime  8)
I was lucky to find a tractor in running condition. I won't start with the restoration until the Lister is complete, but in the meantime I can at least play with it.


I started wiring the panel with what I had laying around.
I need to get a neutral bar and a smaller overload breaker. The one I have is rated at 15A. Although the alternator can do 15A, the engine won't. With the Lister only doing 550 rpm at 1460m above sea level it's not performing like it could. Loading it to 2200W, the exhaust is black and the pump is almost fully open.
A=W/V
A=2200/220
Current=10A

I've been thinking about incorporating protection for external circuitry as well. I see there are commercially available units that monitor over/under voltage as well as over/under frequency. I suppose any one of the two is good enough? Of the ones' I Googled, the voltage monitor seems like the best option. It looks like the frequency monitors need steady input voltages whereas the voltage monitors are powered from the source they monitor. The voltage monitor has an internal relay that can be used to operate a contactor. Anywhere outside the adjustable upper and lower limits the contactor will be open protecting external circuits.

All these gadgets of course come at a price, so perhaps an opportunity for an Arduino project?   


27
Original Lister Cs Engines / Re: Another 6/1 Restoration
« on: October 23, 2017, 11:36:25 AM »
Thank you for the compliments guys. Its good inspiration to keep at it.

Nice work all round. Might be slow - nothing wrong with that and your restoration looks a treat.
I must always add that I also restored my house at the same time. At times months literally passed that I couldn't touch the engine - frustrating times...

Geez that's a nice looking setup!

I think some of us go too far with the restos. Time they are finished they are far too nice to be actually put to work.  Only fit to be taken out of the Lounge room and given a run while guests sit round and watch and listen to them before being put back inside with the rest of the fine Furnishings.

Can't see my old roid ever being like that but maybe one day I'll be able to buy one that's worthy of art status.

How far to go with a restoration? I always ask myself that question and my answer is always "not far enough"... the better you finish it, the more little imperfections start standing out. I've stood back many a times thinking "one day I'll strip it down again and do it properly" :D :D

The two schools of thinking are to either to
 - get it to as close as possible to factory finish, or
 - get is as perfect as possible.

Depending on what it is, I could agree with both. Some things look nice with a "rough finish" showing what it would have looked like back in the day, and others look better all polished up. My Fairbanks ZC-208 is in it's "working clothes" and it looks great, but that look, in my oppinion, would not suit the Lister... or would it?? At the end of the day it doesn't really matter - they all look awesome!  ;)  I agree that all the little imperfections gives each engine it's own unique character - with a shiny finish the character is lost and one engine then looks like the next. That said - nobody designs anything not to be finished off properly - the end result is mostly a costing decision to balance appearance and function. Had Lister spend two more days per engine to fettle and paint each engine to perfection, it would have added no value to the function, and it would be so expensive they would probably not have sold a single engine! I am a planner in the engineering industry so I experience this every day in practice. I wonder what my Lister is worth if I put a hourly rate on my work done  :o

For me this engine is a showpiece - that can actually be put to work if need be, but 99% of the rest of it's life it will be a toy. To compare this to what most of you off-grid guys are doing is not fair.

I hinted to my wife tha I want to pull the trolley into the lounge but she laughed like I was making a joke. I suspect a big misunderstanding is on it's way  :laugh:

Can't see my old roid ever being like that but maybe one day I'll be able to buy one that's worthy of art status.

I reckon that's the trick glort - have 2 engines, one in working clothes, the other a prom queen...

Dieselsmoker - that's a fine looking rig! I don't think you can call it a restoration any more, there's no way even a genuine Lister came out of the factory looking that good! Is that an intake silencer I see? How much of a difference does it make to the running noise? I have an Indian oil bath filter on mine, if it cuts a decent amount of noise out, I'd quite like to make a silencer like yours.

Cheers!
Ade.

Yup - they never looked like this  ;)
I like the way you think - great excuse to get another engine. One to work, one to show.

No it's not a silencer, but it does silence! To be frank - zero intake sound. There was a short discussion and a couple of pictures about this a few pages back: http://listerengine.com/smf/index.php?topic=7426.120

This is a "Donaldson" cyclone aircleaner with pre-cleaner. You would find this type of aircleaner on most tractors and other equipment that operate in dusty conditions. The air is first sucked through a set of angled veins to centrifugally remove heavy particles and dump them in the transparrent bowl. Hence the reference to "cyclone". The air then enters the big cannister where it yet again gets spun through a cyclone. Heavy particles are thrown to the outside and falls down all the way to the bottom into a removable bowl. Air passes through a primary dry paper element, and then trough a secondary dry paper element with finer filtration. The super clean air is then ready to be messed up again by combustion  ;D. These filters offer massive fitration capacity and effieciency. Maintenance is to periodically clean the two bowls and once in a blue moon one could clean off the dust on the outside of the paper element. Replacing the paper elements of course depends on where it was operated, but in most cases they would last many many years due to the effecient pre-cleaning. On this Lister they would never need replacing. 


28
Original Lister Cs Engines / Re: Lister 12/2 rebuild - 1 year on...
« on: October 23, 2017, 08:53:56 AM »
Hi Samo.
Looks great!!! Seeing this picture made me scroll through my Lister album to relive the journey again.

Loooots of hard work and extremely black hands to get to the point you are at now :D The project takes a real exciting turn once assembly starts - probably not long now before the magical moment arrives!  :D

29
Original Lister Cs Engines / Re: Another 6/1 Restoration
« on: October 21, 2017, 07:50:02 PM »
If I knew then what I know now I would name this thread different...
Maybe, "The slowest 6/1 restoration ever"?? LoL  ;D   (It is after all a low speed engine)

Perhaps progress would be better if I didn't have to do things over and over so many times! Lesson learned and now on cooling tank number 3...

On tank number 2 I used a bitumen-based sealant that got really soft and tacky when the water got hot. Eventually water worked through the coating and the tank quickly rusted through again and sprung a leak.

This time round I got some rubberizing that is typically used on the load beds of pickup trucks. So far so good. Looks like this is really durable stuff. I also painted a couple of layers on the wheels and so far the new "tyres" are holding up excellent. No more metal-to-paving crunching. I also used the opportunity to add a tank valve so it's easier to drain the water now.

Nice thick rough rubber on the inside of the tank. Here busy with the first fill.


Brass tank valve. (What a mission it was to find a brass one!)


Brass water fittings also polished up this time round instead of being painted green with the rest of the tank.


With that done I could take a step forward again.
Electrical installation.

Brand new panel. Actually a bit bigger than I need, but this one was a lot cheaper than the smaller size panel  ???


Slight frame modification to allow me to bolt the panel down properly.


I bought a normal (fairly heavy duty) 16A plug socket at the hardware store


....and stripped all the metal bits off:


Some drilling and filing:


...and we have a power take-off!! (It looks pretty lonely down there in the corner)


So the idea is to buy all those yummy gauges and meters (when my ship comes in) and install them in the panel door. There is also space inside for an overload, maybe a earth leakage and who knows what. I have ideas - but of course I'll share when I get there. I'll very likely come pick some brains here sooner or later.

Its now 8+ weeks that I'm waiting for the Lister logos to land here from SEP...  :( I'm starting to loose hope...

EDIT:
The Donaldson also got re-branded. It is now a Lister air cleaner  ;)


Cheers!

30
Original Lister Cs Engines / Re: Another 6/1 Restoration
« on: August 01, 2017, 11:56:56 AM »
Thanks for the kind words guys!
I think I've said this before: Not a lot of people have any idea how much time, patience and effort it takes to do a restoration like this. That said, I did it the hard way by making parts and fixing everything instead of just buying new parts like is more commonly done - It's a lot of hard work, but all the more satisfying to see it taking shape in the end.
   

Pages: 1 [2] 3 4 ... 10